Vis
This page will introduce you to Vis and some of its core functionality.
Contents
What is Vis?
Vis is a tool that allows you to rapidly create 2D and 3D visualizations. It provides a clean and simple interface built upon OpenGL. Vis is not a 3D game engine and it should not be mistaken for such, as it lacks the heavy optimization typically seen in most engines.
Learning to use Vis
This tutorial will introduce you to some basic concepts of Vis. In it, you will create a 3D scene of a snowman with a snowball rolling (or in this case, gliding) around him. If you're impatient, this is the final product and you can twiddle with it at your leisure: File:Visdemo.tar. The tar contains the source final file 'MyVisDemo.java', but also a git commit-history which shows the addition of each of the steps.
Step 1: Initialize a Swing GUI
Start by creating a file MyVisDemo.java in some convenient location and fill it in with the following:
import april.vis.*;
import april.jmat.*;
import april.util.*;

import java.util.*;
import java.awt.*;
import javax.swing.*;

public class MyVisDemo
{

    VisWorld vw = new VisWorld();
    VisLayer vl = new VisLayer(vw);
    VisCanvas vc = new VisCanvas(vl);

    JFrame jf = new JFrame("MyVisDemo");

    public MyVisDemo()
    {
        // Initialize GUI
        jf.setLayout(new BorderLayout());
        jf.add(vc, BorderLayout.CENTER);
        jf.setSize(800,600);
        jf.setDefaultCloseOperation(JFrame.EXIT_ON_CLOSE);
        jf.setVisible(true);
    }

    public static void main(String args[])
    {
        new MyVisDemo();
    }
}
This specifies a new class which launches an empty window, and and sets up an empty Vis context. You can test your code by compiling and then running it
javac MyVisData.java
java MyVisData
Since we haven't added any objects yet, it should look something like

The Vis rasterization process is divided between three classes, the VisWorld, VisLayer and VisCanvas classes. Briefly, the VisWorld is a container for all the objects that are rendered (shapes, data clouds, images, etc). The VisLayer handles the camera angles and event handling, and the VisCanvas interfaces with a GUI component to actually draw that view of the given objects to the screen. The VisCanvas also allows easy movie and screenshot creation.
The VisWorld is a collection of VisObjects; each VisObject determines how to render complex objects such as spheres, robots or images using primitive components (triangles, points, textures). VisObjects can be positioned at any position or orientation. Related VisObjects are organized into a series of "Buffers", which are like layers that can be switched on and off at runtime.
Step 2: Render some objects to the screen (A simple snowman)
To spruce up your creation, add some eyes, nose and a hat. You can specify these in a separate method 'drawSnowman()' which is called from the constructor.
Add the following method, which draws a series of spheres. We specify the radius of each sphere in the constructor of VzSphere, and it's position using a translation from the origin.
    // Part 1: Draw a simple snow man
    void drawSnowman()
    {
        VisWorld.Buffer vb = vw.getBuffer("snowman");

        vb.addBack(new VisChain(LinAlg.translate(0,0,abdomenRadius),
                                new VzSphere(abdomenRadius, new VzMesh.Style(Color.white))));
        vb.addBack(new VisChain(LinAlg.translate(0,0,2*abdomenRadius + thoraxRadius),
                                new VzSphere(thoraxRadius, new VzMesh.Style(Color.white))));
        vb.addBack(new VisChain(LinAlg.translate(0,0,2*abdomenRadius + 2*thoraxRadius + headRadius),
                                new VzSphere(headRadius, new VzMesh.Style(Color.white))));

        vb.swap();
    }
Note that objects are added to the hidden side of a double buffer using 'addBack()'; once all the objects are added, we can draw them simultaneously by calling "swap", which empties the Front buffer, and replaces it's contents with everything in the 'Back' buffer since the most recent
The method requires several constants to be defined (headRadius, etc), which we can insert at the top of the class:
public class MyVisDemo
{
    // Constants for the snowman's size
    static final double abdomenRadius = 1.0;
    static final double thoraxRadius = .75;
    static final double headRadius = 0.56;
Now add a call to the constructor to actually cause the snowman to be drawn, as well as set the camera default camera angle. We also added a grid, which can help to better understand the scene.
...
        // Add a ground-grid, set camera right
        VzGrid.addGrid(vw);
        vl.cameraManager.uiLookAt(new double[]{6,-14,6},
                                 new double[]{0,0,0},
                                 new double[]{-.4,.6,.6}, true);
       // Draw static scene:
       drawSnowman();
   }
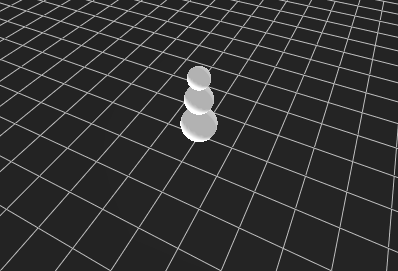
Compile your code, and check the output, it should look like:

Step 3: Add some accessories to the snowman
We can spruce up the scene by adding some more parts to the snowman, including eyes, nose and hat. For each part, we will use a series of 'translate()' and 'rotate()' calls to position the object:
   // Part 2: Draw fancier additions to snowman
   void drawSnowmanAccessories()
   {
       double snowmanShoulders = 2*abdomenRadius + 2*thoraxRadius;
       double eyeElevRad = -Math.PI/6;// how high should the eyes be?
       double eyeSepRad  = Math.PI/8; // how far apart should the eyes be?
double hatHeight = headRadius;
       VisWorld.Buffer vb = vw.getBuffer("accessories");
       // 2.1 Eyes
       vb.addBack(new VisChain(LinAlg.translate(0,0,snowmanShoulders + headRadius),
                               LinAlg.rotateY(eyeElevRad),
                               new VisChain(
                                   LinAlg.rotateZ(eyeSepRad),
                                   LinAlg.translate(headRadius,0,0),
                                   LinAlg.rotateY(Math.PI/2),
                                   new VzCircle(0.05, new VzMesh.Style(Color.black))),
                               new VisChain(
                                   LinAlg.rotateZ(-eyeSepRad),
                                   LinAlg.translate(headRadius,0,0),
                                   LinAlg.rotateY(Math.PI/2), // draw eyes parallel to head
                                   new VzCircle(0.05, new VzMesh.Style(Color.black)))));
       // 2.2 Carrot-nose
       vb.addBack(new VisChain(LinAlg.translate(0,0,snowmanShoulders + headRadius),
                               LinAlg.translate(headRadius,0,0),
                               LinAlg.rotateY(Math.PI/2),
                               new VzCone(0.05,.25,new VzMesh.Style(Color.orange))));
       // 2.3 Hat
       vb.addBack(new VisChain(LinAlg.translate(0,0,snowmanShoulders + 2*headRadius),
                               new VzCylinder(.75*headRadius,.1, new VzMesh.Style(Color.black)),
                               LinAlg.translate(0,0,hatHeight/2),
                               new VzCylinder(.5*headRadius, hatHeight, new VzMesh.Style(Color.black))));
       vb.swap();
   }
We also need to add a line to the constructor to paint the objects:
       // Draw static scene:
       drawSnowman();
       drawSnowmanAccessories();
   }
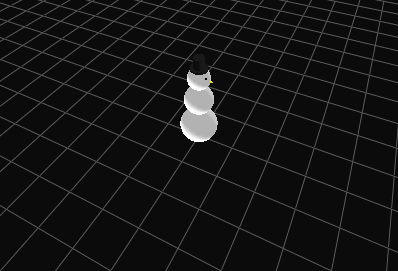
Try compiling your code, it should look like:
 note that we placed these new objects into a different buffer, enabling us to enable/disable them at runtime. To do this, Ctrl-right click into the vis pane, and choose the menu option "Show Layer/Buffer Manager". Then click into the green box to enable/disable each of the buffers.x
Step 4: Making animations
So far, the scene we have created is static -- however, the vis scene is redrawn often -- usually at 20 fps. This means we can display scenes that change over time. By repeatedly drawing into the same buffer, each time we call 'swap()' the outdated objects are replaced by the newest objects we've added to the buffer. To see this in action, we will animate a snowball orbiting the snowman. To accomplish this, we will introduce a new Thread which repeatedly updates the position of the snowball, and then adds vis objects at the correct location. Add the following sub-class inside MyVisDemo:
   // Step 3: Make a snowball roll
    class RenderThread extends Thread
    {
        public void run()
        {

            final double fps = 10.0;
            final double snowballSpeed = 2.0; // meters per second
            final double snowballOrbitRadius = 3.0;
            double angle = Math.PI/2;

            while (true)
            {
                VisWorld.Buffer vb = vw.getBuffer("snowball");
                vb.addBack(new VisChain(LinAlg.rotateZ(angle),
                                        LinAlg.translate(snowballOrbitRadius,0,1.0),
                                         new VzSphere(1.0, new VzMesh.Style(Color.white))));
                vb.swap();

                TimeUtil.sleep((int)(1000/fps)); // 10 fps
                 // update the angle
                angle += (snowballSpeed/fps)/snowballOrbitRadius;
            }
        }
    }
We can now spin off a new instance of this thread, by adding the following lines to the constructor:
       // Start Render thread for animation
       new RenderThread().start();
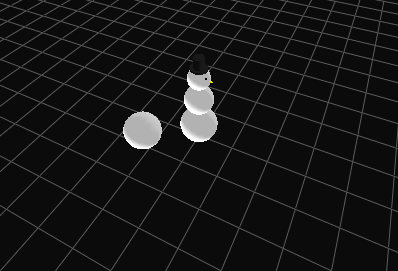
This will cause the 'run()' method to be called, which in turn will update the position of the snowball 10 times per second. We position the snowball by rotating about the origin by an angle which is monotonically increasing. Run your code and double check that it looks like this:
